
Dave Robinson takes a look at the new Maxon CM10 and gives his opinions on the performance of this budget priced CB radio.
Introduction

The Maxon CM10 is a new design of multiband CB transceiver from Maxon CIC and in its standard form is intended for the European market, meeting the requirements of the harmonised CEPT European CB standard. Existing national standards within Europe are also provided for which permits this rig to be used throughout Europe by using a pre-set country selection system accessed via the front panel.
The standard form gives a total of 8 different country options.
Opening an internal option link (Option 1) puts the unit in a Export configuration and permits a much wider range of frequencies to be accessed. This allows general coverage of both the 10 and 11 metre HF bands and doubles the country selection options to give a total of 16 groups. It should be emphasised that opening this link voids existing unit approvals and will also negate the CM10 Warranty.
The Maxon CM10 makes a very favourable first impression because it is compact, well finished and is not overburdened with front panel controls. I would suggest that it is even minimalist but there are hidden unit capabilities which reveal themselves with use.
The unit is switched on by rotating the volume control (on the left hand side of the panel)
in a clockwise direction at which point the channel display will flash for a few seconds at a rate of about 1Hz. The flashing number on the channel display represents the current country code and if left unaltered will change at the end of the flash period (about 3 S) to a give a steady display of the last channel number in use when the unit was switched off.
Last channel retention is a nice feature of the Maxon CM10 and applies to all country groups individually (i.e. the ‘last used’ in Group 0 is stored separately to the ‘last used’ in Group 1) so in this respect each group does not affect other groups– someone at Maxon has actually thought about this!
To select another country group all that is required is to press the channel change ‘UP’ button BEFORE the unit is switched on and maintain this state while the unit is switched on until the display flashes. The display will flash at the 1Hz rate while displaying the current country group selection and pressing the ‘UP’ (or DOWN) button momentarily will then increment (or decrement) the country group code number displayed, except that this is indicated at a faster flash rate (~0.5Hz). To confirm the new country group all you need to do is to press and hold the DOWN button until the display stops flashing at which point it will display the ‘last used’ channel number for that group – dead easy.
The standard European country codes are as follows:
| 01 : ITALY/SPAIN (40Ch AM/FM) | 02: ITALY (36Ch) |
| 03: GERMANY 1 (80Ch AM/FM) | 04: GERMANY 2 (40Ch AM/FM) |
| 05: EUROPE / FRANCE (40Ch AM/FM) | 06: CEPT (40Ch FM) |
| 07: UK (40ChFM + 40Ch CEPT FM) | 08: POLAND (40 Ch AM/FM) |
In export mode the country group codes continue in sequence : 09, 00, 11, 12….16 but you should refer to the CM 10 selection tables for channel / frequency interpretation.

In UK mode (07) the CEPT 40 channels are selected by pressing the AM/FM selection button at the bottom left of the display window and revert to the UK40 group by pressing this button again. When the CEPT 40 are selected in UK mode, the decimal point at the base of the right hand digit is illuminated (see Fig1) and the display changes to show the ‘last selected’ number for the UK CEPT group : i.e. we have two ‘last selected’ memories in UK mode, while everyone else has to make do with one.
In country groups where the use of AM is permitted, the AM/FM button does exactly what you would expect – it selects the modulation scheme. FM is in use when the green FM LED is lit in the front panel display window (see fig 1). The red TX LED above it is lit whenever the unit is transmitting.
Repeated pressing of the Ch9 /19 button cycles the unit between channels 9 and 19
and the current selected channel; very efficient and easy to use, even with gloves on.
Changing channel is accomplished by pressing either the UP (or DOWN) button – a single press will move one channel per press, whereas holding a button pressed will cause automatic channel increment (decrement) until released, but this does not cause a scan.
The Maxon CM10 also has an autosquelch (ASQ) facility which when engaged causes the receiver squelch level to automatically adopt an internally preset squelch level. ASQ is engaged by simply turning the squelch control at the right hand side of the front panel, fully anti-clockwise until it ‘clicks’ at which point ASQ is enabled.
Very handy to use when mobile and all you normally need in a nice small box.
So how well did mine work when I first got it?
It worked ‘straight out of the box’ and initial results were good. RF output power was exactly 4 Watts when it should be and 1W when this was required. The receiver was very sensitive and the audio output level adequate enough for use in a truck cab although I had bought mine for my car. Power input line filtering was excellent with no perceptible alternator or ignition noise breakthrough and the very first copy on my CM10 was an effortless 25 miles with an excellent S5/R5 from the far end. OK, I was in a pretty good spot, but using a basic radio. One swallow does not a summer make but nevertheless it was a good start. Subsequent listening revealed that the CM10 was absolutely merciless to those of the CB fraternity who had been ‘dabbling’ internally with their FM deviation in an attempt to ‘improve’ their modulation and it was similarly tough on any of those with a power microphone who had it turned up too far. If only these guys could have heard just how bad they sounded on the CM10 then they wouldn’t have bothered…
I had already guessed from the published specification that the CM10 was very selective (an adjacent channel rejection of 65dB needs one hell of an IF response) and a quick look at the circuit diagram (full marks to Maxon for include this in the manual) revealed the reason why; the CM10 uses a crystal filter where most other rigs would use a ceramic filter to get an ACR of 60dB (on a good day!). I reckon that my CM10 is sharp enough that I could use it to set the deviation on a rig that was barely giving me S1.
Rigs that were set right, sounded excellent but if they weren’t…
I did have some issues with my CM10:
-
The audio bandpass filter shaping in the microphone amplifier/limiter provides a bit too much roll-off at the upper end for my liking and I think that it would benefit from a better AGC system in the audio circuits. I can’t be bothered to redesign it right now but who knows…
-
There is no S-meter on the CM10, neither is there any provision for an external S-meter and if I ever do any modifications to mine it will be to add an external S-Meter socket. Examination of the circuit diagram suggests that this will be a trivial thing to add (apart from performing some microsurgery on the PCB).
-
Connecting a frequency counter to the transmitter output revealed that the factory trimming of the PLL reference oscillator had been a bit too quick and my unit was about 400Hz low – not a lot I grant you but of course in a double conversion superhet, if the 1st mixer frequency is off-frequency then everything else suffers accordingly and with an IF response like falling off a cliff…! A minor tweak of the PLL oscillator trimmer and all was well (this did clean up a few breakers who were borderline but there was still no hope for some). I would therefore recommend that anyone contemplating a CM10, should get it frequency checked if all stations sound very clipped or scratchy.
-
The ASQ level on my unit was set a tad tight for my liking but a very simple readjustment of the ASQ preset on the PCB which allowed an S3 signal to open the ASQ has proved to be perfect. In the absence of an S-meter, if a station can open the squelch in ASQ mode, then they are automatically S3 or better and how much better you can probably estimate from the degree of receiver quieting. Try it with a rig fitted with an S-meter and you will see what I mean. If you believe all that “5&9” BS then set the ASQ to open at S9 and simply tell the truth!
Other than that I am very pleased with my CM10. The mike feels nice in the hand and is the right weight for its size (Maxon have loaded it internally with some extra mass to give it a better feel). Pretty robust too, unlike some earlier creations (remember the Maxcom 4E?) The radio is provided with an ‘up or under’ mounting bracket and should fit almost anywhere in the modern car.
So what is under the hood?
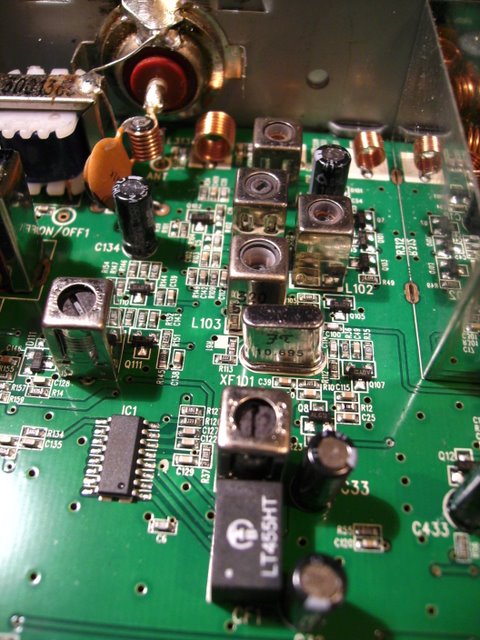
Removing the covers revealed a really nice clean PCB with no extra links or bodges added which is always a good sign. The PCB is double sided fibre-glass with plated through holes and where possible uses surface mount components (SMDs) in its construction. This suggests to me that it was made on a multi stage automated assembly line using ‘pick and place’ machines with ‘state of the art’ IR solder reflow – with this degree of investment you should expect a consistent production quality. When I looked at mine critically I wasn’t disappointed as all components were mounted exactly to the assembly standards with which I am most familiar. Excellent quality and the Maxon CM10 ought to be pretty reliable in service.

| ASQ: ASQ Level Preset | TXP: Transmit Power Level Preset |
| TSQ: Squelch Threshold Preset | AML: Amplitude Modulation Level Preset |
| OSC: PLL Reference Oscillator Trim | FM DEV: FM Deviation Preset |

To summarise:
Do I like it – definitely. I think that the CM10 is a fresh new design and ought to do very well as it offers excellent performance at a very affordable price, in a compact package.
Maxon CM10 Technical Specifications
| General | |
| Channels | 40 Ch AM/FM 4W [Standard version] 400 Ch AM/FM 4W [Export version] |
| Frequency Range | 26.565 to 27.99125 MHz [Standard version ] 25.315 to 29.105 MHz [Export version] |
| Frequency Control | Phase Locked Loop Frequency Synthesiser [ Referenced to10.240MHz Quartz Crystal] |
| Operating Temperature Range | -10º / +55ºC |
| DC Input Voltage | 13.2V ±15% |
| DC Current Drain | 150 mA [Standby] 820 mA [Max. Audio] 1100 mA [Transmit] |
| Dimensions | 180(L) x 35(H) x 140(D) mm |
| Weight | 750 g |
| Receiver | |
| Type | Double Conversion SuperHet. |
| Intermediate Frequency | 1st IF : 10.695 MHz 2nd IF: 455 KHz |
| Sensitivity | 0.5 μV for 20dB SINAD (FM)0.75 μV for 20dB SINAD (AM) |
| Image Rejection | 65 dB |
| Adjacent Channel Rejection | 65 dB |
| Signal / Noise Ratio | 45 dB |
| Audio output power @ 10% THD | 2.0W @ 8 Ohms |
| Audio Distortion | Less than 8% @ 1 KHz |
| External Speaker Impedance | 4 – 16 Ohms |
| External Speaker Jack | 3.5 mm Mono |
| Transmitter | |
| Output Power | 4W @ 13.2 VDC |
| Output Impedance | RF 50 Ohm Unbalanced |
| Modulation | FM : 1.8 KHz, ± 0.2 KHz AM : 85% to 95% |
| Frequency Response | 400Hz – 2.5 Khz |
| Signal / Noise Ratio | Better than 40 dB |
| Microphone Input | Condenser (Electret) compatibleWill also accept 600 Ohm Dynamic |
| Hand Microphone (as supplied) | Condenser with PTT switch4 Pin Ring Lock Connector |
My thanks go Dave Robinson, 2A0FX for this great review. Don’t forget that you can also download the frequency charts that Dave has produced for help with the CM10. The charts show the various configurations available in EU and Export modes- TM1.
I have 2 Model KCB-10C 40 Channel CBs (virtually unused) and would like to find a source for a DV-7210 120 v charger. I live in Phoenix, AZ.
Thank you,
Ron Tweedy
(602) 437-2585 H; (602) 882-2585 C
the rig sounds good but got wierd band selection
i have had one of these for about a year now, can fault it except the mic cable keeps coming away from the socket that attaches to cb, its on the passenger seat, so no excess strain on cable
How do I download the frequency tables for the Maxon CM10 ?
Tony.
Hi how do I open it up to export mode ?